

How To Have Your Own Blog Website
Last Updated on November 21, 2021
This article recommends the best website builder for artists, photographers, writers, and creative entrepreneurs wanting to create a website that is visited by lots of people. It compares several blogging and website platforms, such as Wix, Blogger, Squarespace, Weebly, and WordPress, and is written by an experienced high school teacher with a beginner audience in mind. It concludes with a step-by-step tutorial, showing the exact process used to set up a successful, high-traffic website.
Should I build my own website?
In 2011, I created a website to showcase my artwork and help high school art students gain good grades. One year later, this site was receiving over 1000 visits every day (this became the website that you are reading, the Student Art Guide). If I have learned one thing from this experience, it is that the internet holds enormous value for creative individuals. Making a website is the most effective way to market your work, build a brand, and sell artwork, products, or services. What's more, creating a website is something that even a high school student (someone with little funds and no prior web design experience) can do.

Websites for artists and other creative people: why they are important
It used to be that great art was discovered by galleries, written manuscripts chosen by publishers. These days, great content is discovered first-hand by ordinary individuals. There is no longer a barrier between the artist and the masses. If you have an online presence – and your work can be found, shared, 'pinned' or 'liked' – you can achieve a level of recognition that could once only be dreamed of. A single image or blog post can receive thousands of views in a very short time-frame; be seen by vast numbers of prospective clients, admirers, and fans. If you are an artist, photographer, writer (or any other creative entrepreneur), you need to harvest the power of the internet and create your own website as soon as possible.
Why platforms like Instagram, Facebook, Pinterest, Flickr, DeviantArt, Behance, Saatchi Online, Fine Art America, Imagekind, RedBubble, Etsy, and Tumblr are not enough
There are many social media platforms where sharing content is encouraged. These can be helpful for promoting your own work, meeting others with similar interests, gaining feedback, and reaching others via extended social networks. Being an active member of some these sites can be a good idea – and may indeed form a fundamental part of your online strategy – but these sites should complement, not replace, your own website. They should be used as a marketing outpost to drive traffic to your own website, not as a substitute for it.
* A warning about free website builders / free portfolio websites
Many people search Google looking for the 'best free website builder for artists' or a 'free artist website.' Others look for more specific information, comparing various website builders, such as Wix vs Weebly vs Blogger vs Squarespace vs Google Sites vs Adobe Spark Page and so on. These platforms, along with many others, offer customizable websites, and target those who are looking for an easy way to display their work online (these platforms allow you to set up basic photography portfolio websites or graphic design portfolio websites, for example, usually with higher-priced premium plans marketed alongside). These website builders are typically slick and aesthetically pleasing, with drag-and-drop templates that are appealing for beginners. Indeed, these can be a suitable option for those who wish to create a website to share with family or friends, or a temporary online portfolio, but they should never be used by someone who is serious about getting their website ranked highly in Google and seen by thousands of people every day.
For the best chance of success, you need to create your own original website.
Here's why:
1. You need total control over the appearance and design.
Aesthetics is important. Websites should showcase your creative work professionally and communicate style and individuality, helping you to stand out from the crowd. This cannot be achieved with a standard page on a free site, using a template that looks like a million others. With your own website, you can select a great design theme and customize this however you like.
2. You need to have an awesome website name, NOT yourname.freeservice.com.
A website name is the starting point for your brand. For as little as thirteen dollars per year you can create the illusion that you are a professional worth investing in. Take your work seriously. With domain names costing so little, there is no excuse for not having your own.
3. You need to optimize your website so that it ranks highly in Google.
If you cannot optimize your content for search engines, your website is left floating alone in cyberspace, relying on endless social media promotion and kind visits from friends. Humans must love your content, but just as important: Google must love it. Google has a secret (and constantly updating) algorithm that they use to determine where websites should appear in the search results. When someone searches for something in Google the search engine carries out a complex calculation (it takes a fraction of a second) to estimate which – of all of the websites in the world – you want to see. According to Search Engine Watch, 33% of people click on the first result shown in Google, 18% on the second result, and even fewer on the third. If your website doesn't make it onto the first page of results, only a tiny percentage of people will ever find it.

One of the reasons that the Student Art Guide ranks highly in Google is that our articles are comprehensive, highly detailed, and take weeks to write. Another reason is that our content is well-optimized for search engines. This means that Google understands what each page is about, and is thus more likely to rank it highly, so thatpeople can find us. In fact, there is a very good chance that you arrived at this article after Googling "how to make an artist website" or something similar. Well, this page is optimized for that phrase, and many other similar terms!
Search Engine Optimization (SEO) is impossible on most free websites and social media platforms. To make matters worse, Google knows whether your website is created using a free platform, and may perceive your website accordingly: as less professional, less serious, and less important.
Unfortunately, sometimes these lower barriers (meant to encourage less techy audiences) can attract some dodgy characters like spammers who look for cheap and easy ways to set up dozens or hundreds of sites that add little or no value to the web. When it comes to automatically generated sites, our stance remains the same: if the sites do not add sufficient value, we generally consider them as spam and take appropriate steps to protect our users from exposure to such sites in our natural search results. – Google Webmaster
In other words, with a free platform, you must work that much harder to convince Google that your content is worth ranking, and, even then, you don't have the tools to make this easy: you start with a disadvantage. This is one of the most important factors to consider when deciding whether to create your own website.
4. Schools and universities must be able to view your content.
A growing number of schools and universities are blocking all access to social media and free blogging platforms, because, as noted above, these are often used by spammers and those who share dodgy content. Some teachers spend months creating a website using a free platform, only for this platform to be later blocked by their school.
Furthermore, even if you have no direct connection to the education industry, there is a huge advantage to having your work discoverable by educational institutions. For example, students in the UK often find my artist website and study my artwork. Schools then link to my website. Authentic links from relevant websites provide a signal to Google that my website is high-quality (links from educational institutions are considered extra-valuable). This, in turn, makes Google trust my website more and rank it even higher. As noted above, sites that are ranked highly gain more visitors.
5. You need your work to be celebrated, not lost in the crowd.
When someone contemplates buying your artwork (or other products) on a social media platform, or a communal website with multiple sellers, buyers are often distracted by the countless other items showing up in their feed. You want people to be channeled towards your fantastic creations, without others competing for attention. On social or community websites, buyers are easily enticed away.
6. You need to control how you make money from your website.
If you have your own website, earning opportunities are controlled entirely by you. You can sell artwork, products, or services directly from the site. You can add advertising, seek sponsors, recommend affiliate products, embed print-on-demand items, or simply concentrate on building your brand, popularity, and fame. Social media platforms and free website builders often place inappropriate advertising alongside your work or have strict policies governing the way you operate business upon their platform. It is very common for free website builders to plaster their own branding all over your website, attempting to direct your visitors back to them. Generating income from your own website is much easier. If you want to sell artwork online, for example, this can be achieved in a matter of minutes, by adding a 'buy now' button beside the work. Alternatively, you can add professional shopping carts or any other commercial feature.
7. You need to measure the number of visitors to your website and other important statistics.
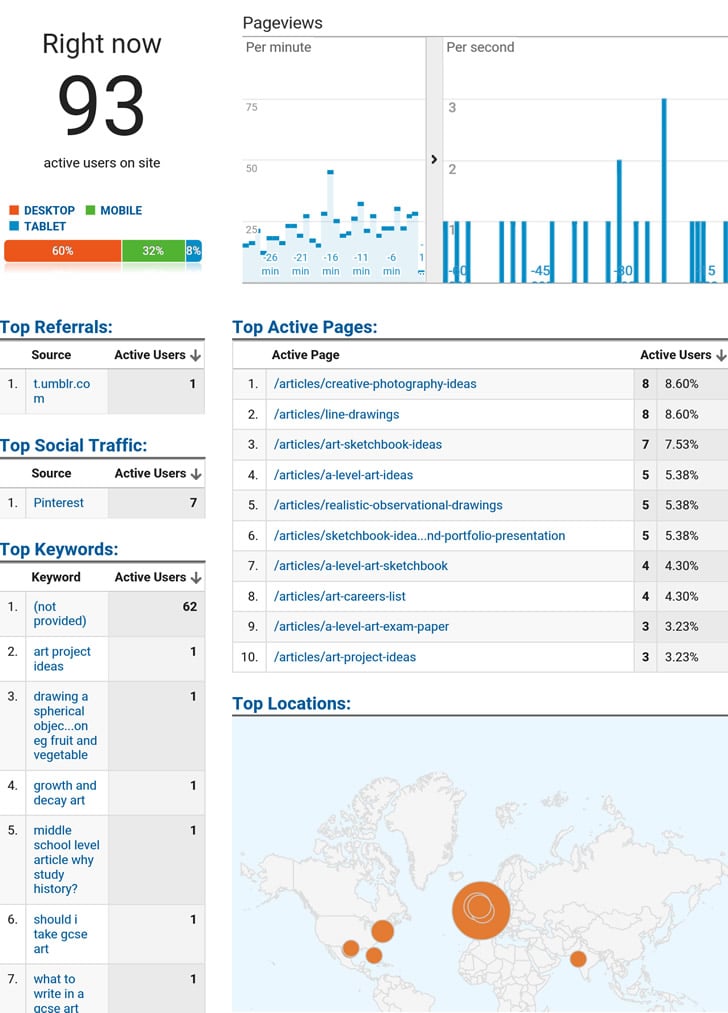
'Google Analytics' and 'Search Console' are free tools built by Google that are easily integrated with your own website. Most free website builders or social media platforms do not allow you to use these, and offer inferior statistics, if any at all. Google Analytics and Search Console provide in-depth information about those who visit your site. For example, you can see which countries visitors are from, how many minutes they spend on certain pages, which pages they leave immediately, and what they typed into Google prior to arriving at your site. This information is invaluable. It helps to shape and direct your creative work and improve your content for the future.
8. You need the ability to build an email list.
A few years ago, Facebook changed their newsfeed algorithm so that each 'status update' made from a Facebook business page was shown only to a small percentage of followers. To have posts shown to more fans, you must now pay money to promote these – even to those people who have chosen to follow your page. As such, the value of having a large Facebook following diminished overnight, crippling many small businesses who relied on Facebook to reach their audience. Similarly, YouTube recently made significant changes to their algorithm, affecting which videos are shown to viewers, making it more difficult for creators to get their videos seen. YouTube also 'shadowbans' certain content and demonetizes videos if they deem them to fall outside of their ever-changing guidelines.
Originally, the YouTube subscription feed was a chronological list of videos from all the channels that a person had chosen to "subscribe" to. …[]…However, many video-makers have previously complained that some of their videos have not appeared in the subscription feed, and have questioned whether YouTube manipulates the list to boost viewer retention and advertising revenue. – BBC News (2018)
Social media platforms are businesses that prioritize their own interests. If you have your own website, you have the option for your audience to safely share their email address with you. This means you don't need to be at the mercy of third parties: you can contact your followers whenever you like. An email list is an asset that you can backup, giving you direct contact with your audience, no matter what happens. Almost all online entrepreneurs regret not starting an email list sooner. An email sign-up box can be added in a couple of minutes to your own website.
9. You need to be able to easily move your website files from one location to another.
If you start with a free blogging platform and then later come to the realization that you should create your own website (as most who are serious about marketing their work online eventually do) moving your content from the free platform to your own website is often difficult and frustrating (it may require manually cutting and pasting every item – recreating the entire website again). Whatever method you choose to create an online presence, it needs to be portable. Moving, downloading, or backing up material from your own website is simple – you have access to every single one of your files and can export these with a few clicks.
In addition, if you decide to switch from a free website name (i.e. yourname.freeservice.com) to an original website name (i.e. yourname.com), any search engine authority that you have previously built up with Google will be lost, requiring the new website to work its way up the rankings again from scratch.
10. 100% of the website must belong to you.
When you create a website on a free platform, your website is really a subsection of someone else's site. Website providers can shut down unexpectedly, taking your content and followers with them. Those who offer free services are particularly vulnerable to collapse. For example, Wikispaces has the following message on their website:
As stated in our communication in January 2018 and subsequent site banners; as of July 31st, 2018 all Free and Classroom Wikis were disabled and are no longer accessible.
In addition, platforms can ban you or delete your files and there is nothing you can do about it. They can suddenly be overtaken by a more successful platform, as happened when Facebook increased in popularity and MySpace dwindled. They can be sold to another company, who may run things totally differently, such as when Flickr was bought out by SmugMug. If you have the potential to create a beautiful, stunning website, it is too risky for this to be at the mercy of another company. It is too valuable of a resource. You need to create your own website.
Why you need to make a website soon
If you are serious about growing an audience online, you need to make your own website as soon as possible. Here's why:
1. Older websites rank higher in Google.
There are many factors that influence where a website appears in search engines (the higher you rank, the more visitors your website receives). The age of the website is one of these factors – a signal that your website is more likely to be a genuine, authority site. The sooner you start, the sooner you can begin to build your website's authority with Google.
2. Website names are limited.
As time goes by, fewer quality website names (known as 'domain names') are available:yourname.com may already be gone. Many great domain names have already been purchased and are being resold for thousands of dollars (the tutorial below shows you how to check which domain names are still available).
3. Unpredictable lockdowns mean that more and more people are shopping online
If ever there was a time to establish an online presence, it is now. Many artists and creative entrepreneurs who previously contemplated building a website have urgently prioritized this activity, given the events of the past few years. Many teachers are also deciding to create websites to help guide their students via distance learning. This adds a further rush of people snapping up domain names and building websites.
4. Your age and current circumstances are not a barrier to success.
You do not need to wait until you are older, have more time or are more 'successful.' Creating a websitesounds daunting, but it takes only about an hour to get up and running. Many great websites are built by young people, with little funds or resources. Teenagers as young as 14 have seen huge online success. With parental permission, you can get started while in high school. Setting up a website can be an excellent project for a high school Art, Design, or Technology student. With hard work, a website set up during high school can be earning money by the time you are in university or college. Furthermore, the skills you learn while creating a website can help your employment prospects immensely at graduation. The best thing is that the whole process is fun. It is exciting and rewarding – almost addictive – watching people from all over the world land on your website and view your content, day after day. ?
What is the best way to build an artist website (or any website, for that matter)?
There are two basic ways to create an original website. The first is to use an existing 'content management system.' A content management system can be thought of as something like Microsoft Word. It is a program or tool that makes the process of creating a digital document MUCH easier. Content management systems are designed for the ordinary user, so that coding is not necessary. They save time and money while allowing for creative one-of-a-kind outputs to be achieved.
The second way to create an original website is to hire developers (or learn to code yourself) and build the entire thing from scratch. Even if you have sufficient funds to hire a developer, or know how to code, in almost all cases, it is wise to use an existing content management system. Not only does this save you time and money, but a site that is built from scratch is much harder to maintain, as only the person who understands how it works is the one who built it. When you use a popular content management system on the other hand, there are many tutorials and forums online sharing advice. If at any point you get stuck, there are answers online to just about every question you could imagine. Additionally, there are thousands of developers who specialize in each popular content management system. This means you are not reliant on a single expert who knows your website well nor vulnerable if this expert leaves.
The upshot: Unless you have a team of specialist developers and are trying to create something like the next Facebook, using an existing content management system is far-and-above your best option.
Which content management system should I choose?
Many of the free website builders (such as Weebly, Wix, and Squarespace) are in fact a kind of content management system. However, these are simplified and tied to a single company, leaving them vulnerable to many of the weaknesses described above.
The leading content management systems are 'open source': this means they are maintained by a huge collection of expert developers around the world (rather than connected to a single company). As such, they follow best coding practices and are kept up-to-date.
According to 2019 data,the leading content management system in the world is WordPress (used by 61% of the market), followed by Joomla (5%), and then Drupal (3%). Not only is WordPress the most popular content management system, but an estimated 34% of all websites in the world run on it. I have used WordPress since 2011 and recommend it above all else. It is hands-down the best website builder for artists – or for anyone else who wishes to create their own website. For entrepreneurs, bloggers, writers, or artists who wish to market their services, promote products, or create any other kind of content-based website or blog that is viewed by a lot of people…WordPress is the best solution.

WordPress can be customized to look like anything – from an informal blog (a casual, comment-driven website) to a professional business website. It can be used to create a stunning online art portfolio or to present work in any way that you desire (written text, illustrated articles, scrolling images, image galleries, embedded video clips, and so on). Just as you can add an 'app' to your phone to add extra functionality, you can add 'plugins' to a WordPress website, enabling you to do almost anything (there are over 52,000 WordPress plugins available). As an example, there are free plugins to add email forms, social share buttons, buy now buttons, shopping carts, email signup boxes, search engine optimization, and so on.
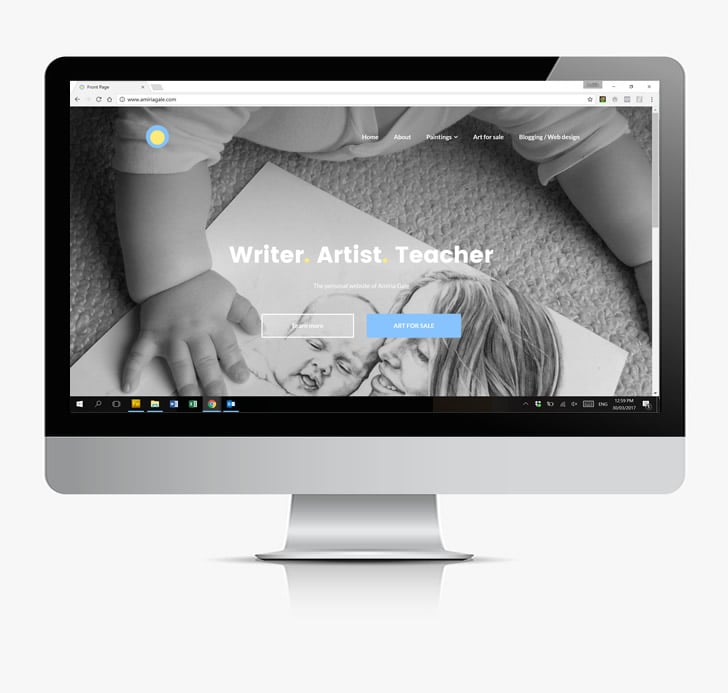
To change the appearance of a WordPress website, you click a button to activate a new 'theme.' Some WordPress themes are simple and minimalist; others are complex. All can be customized, depending upon your needs. The image below shows how my personal artist website www.amiriagale.com has morphed and changed over the years, beginning with a very simple WordPress theme.

How hard is WordPress to use?
Once you are familiar with WordPress, it has a similar difficulty level to Microsoft Word. However, as with anything new, the first few days can be frustrating. A beginner hasn't learned where all the buttons are, so every task requires consciously thinking through the steps. To complicate matters, the signup process uses terminology that is foreign to most people, making the whole thing seem unnecessarily daunting. To help ease beginners through this process, I have created the tutorial below.

Using WordPressis harder than sharing something on Facebook or slapping together a free drag-and-drop website.But it's not nearly as hard as you think. The best way to learn is to dive in the deep end and begin. Once you get through the first few weeks, it is very straight-forward. In a way, it is almost good that itappears daunting, as this cuts out many of your potential competitors, and gives you an advantage.
How much does WordPress cost?
WordPress itself is free. However, you need to purchase the website name (the domain name) and a place to store your website files online (this is called 'hosting' and is explained in more detail below). WordPress is the software or tool that is used to create the website (just as Microsoft Word is used to write a document). However, in order for people toseeand visit that website, it needs to be safely stored online somewhere. For example, if you built your website on your own computer, every time you turned your computer off, your website would be offline. To have your websiteonline 24/7 – and available for others to visit, yet protected against hackers and viruses (this is not an easy task, as hackers constantly use automated software to crawl the net looking for loopholes) – you need to find a company who specializes in web hosting.
Every website needs hosting. Places that offer free websites pay for the hosting themselves, in exchange for making money in other ways. Facebook, for example, offers you free space to upload photos and chat with friends, while they make money from advertising. Wix and Weebly offer basic free websites, knowing that many users will grow frustrated with the limitations of a free plan (as per all of the issues described above) and then buy their premium plans. In other words, you may not pay for the hosting initially, but you pay for it in other ways.
The best way to create your own website is what is known as a self-hosted WordPress site. This means a website that is built using WordPress and is stored safely online at a professional web hosting provider of your choosing. This gives you far more flexibility than any of the premium packages offered by the likes of Squarespace, Wix, or Weebly, for a much lower price. It also gives you the most security and peace of mind, because you can easily move your website from one hosting provider to another, if need be: you are not reliant on a single company. The website is owned entirely by you.
* A note about wordpress.com and wordpress.org
Confusingly, there are two official WordPress sites. WordPress.com allows you to set up a basic free WordPress website: this is not advisable, for the reasons listed above. In order to customize a WordPress website fully, and acquire all the benefits of owning your own website, you need to use thecomplete, open-sourceversion of WordPress, described at WordPress.org (you don't actually need to visit WordPress.org, because everything is taken care of by your chosen hosting provider – as shown in the step-by-step tutorial below). Signing up for hosting and installing WordPress is very straight-forward and takes only a few clicks.
In summary, to create your own website you need three things:
- A domain name: this is the website name, such asstudentartguide.com.
- Website hosting: this is rented space on a large server where you store the website files so that your site can connect to the internet 24/7 (see my recommendations below).
- A content management system to build the site, such as WordPress, which is free.
Let's now go through these steps in detail.
What you need to build your own artist website: a complete WordPress guide
What follows is the tutorial I wish I had when I started. It is a complete beginner's guide for those with no prior web design experience. It contains step-by-step screenshots, accompanied by clear instructions, showing how to set up a new WordPress website.
Step 1. Brainstorm a catchy, memorable website name (your 'domain' name)
The first step is to come up with a website domain name, such as www.studentartguide.com. Common formats for a visual art website include: www.yourname.com,www.yournameartist.com,www.yournamephotographer.com and so on. Sometimes website names include keywords related to the particular genre of artwork (such aswww.yournameportraits.com) however you should be careful to select a name that doesn't limit you unnecessarily.
Tips for choosing a good domain name are as follows:
- Communicate the intention of your website, without being spammy
- Aim for a short and memorable name
- Ensure that it is easy to spell, with no unintentional meanings when words are merged
- Avoid numbers and dashes, so that it is easy to say aloud
- Choose a .com extension or a country-specific extension (such as .co.uk or .co.nz) if targeting a local audience only
- Avoid similarities with existing sites or infringing upon trademarks
These tips are communicated in the infographic below.

DISCLOSURE: The Student Art Guide provides content free-of-charge so that all students and teachers can access our resources. We make money through advertising and affiliate links. In this article, we link to hosting providers that we recommend completely: our reputation and success depends upon this. Purchasing hosting via these links allows us to continue to deliver quality resources to you, for free.
Step 2. Buy the domain name and hosting package from a reputable hosting provider, such as Bluehost
www.bluehost.com is one of only three hosting providers officially recommended by WordPress:

As noted above, the role of a web hosting company is to provide you with space on their server to store your website so that your site is safe and accessible on the world wide web 24/7. Most hosting companies sell domain names also, allowing you the convenience of purchasing both from the same place.
The web hosting industry is extremely competitive, and thus prices and services often change with time. I previously recommended SiteGround hosting, however, SiteGround's prices increased dramatically in 2020 (their cheapest plan now renews at $19.99 USD per month), and their access to live chat support declined.
In contrast, Bluehost's introductory rate for their Basic plan is currently discounted to $2.95 per month. Bluehost also have live-chat support available at any time of the day. Bluehost also offer the domain free for the first year, making them a far more cost-efficient option overall – with prices that are within the reach of even many high school students.
NOTE: If you love creating beautiful, artistic things, building a website is likely to be your most fun project yet. If you get stuck at any point during this tutorial, feel free to email me. My name is Amiria Gale, and I am a high school teacher from New Zealand. Alternatively, Bluehost have trained support staff available on-hand via live chat. Questions help me to improve this tutorial and provide valuable feedback, letting me know when something has become outdated (technology changes very fast)!
Let's get started!
a) Begin by visiting: www.bluehost.com

b) Click the 'Get Started' button to see Bluehosts different hosting plans.

c) Select a hosting plan. The 'Basic' and 'Plus' plan are both suitable for beginners. The main difference between these is that the Plus plan allows you to host an unlimited number of websites, whereas the Basic plan only allows you to host one. The Plus plan also has more storage space, which can be beneficial for artists. After you have decided which plan you would like, click 'Select.'

d) On the next screen, type in your chosen website name under 'create a new domain' (I have used 'portfolioexample.com' to illustrate this process). Choose whether you would like .com or some other extension. Then click 'Next' to see if the domain name is available. Remember that domain names get snapped up very quickly, so your first choice may not be available.

e) Once you have chosen a good domain name, enter your personal details, so you can sign up with Bluehost.

f) IMPORTANT: Select the hosting period (how long you want the hosting for). This is important because the discounted pricing only applies for the selected period and the amount is paid upfront. By adjusting the drop-down menu beside 'Account Plan,' you can see that the discount varies depending on the length of time you select. For example, the monthly rate is cheapest when you purchase hosting for three years in advance. This is common practice across the hosting industry and is their way of rewarding customers who stay with them for a greater length of time. Selecting three years also allows you to lock in the discounted rates for the longest period. (Bluehost has a 30-day money-back policy for hosting, so regardless of which period you select, you can get a refund if you change your mind). Once you have decided which time period you would like, scroll down to the next section.

g) Here is where Bluehost upsell a variety of different options. Some of these are recommended; others are not necessary.
- 'Domain Privacy + Protection' – highly recommended. All website owners are required to have their contact details in a public database called WHOIS. This archaic rule was created when there were very few websites in the world and it was an effort to make a kind of telephone book with contact details listed. To get around this, hosting providers offer 'Domain Privacy,' which replaces your contact details with the host's generic contact information and keeps your private data safe. If you have signed up using a business address and contact phone number, Domain Privacy may not be necessary, however, for most people, it is highly recommended.
- Codeguard basic – this is a service that backs up your website, so that you don't need to worry about carrying out manual backups of your website. I didn't select this when I was just staring out, however this is up to you.
- Bluehost SEO tools – not necessary. WordPress comes with all the Search Engine Optimization tools that you need, free of charge, so I don't recommend choosing this.
- Microsoft Mailbox – not necessary (but up to you).
- SiteLock Security – This scans your website for malicious code and helps protect against hacking. Although hacking is rare, all websites are vulnerable to this. When creating a new website, I keep things as cost-efficient as possible, however, whether you choose to include this is up to you.
h) Lastly, enter your contact information and payment details. If you are under 18, please seek parental permission before entering credit card details. Click submit!
i) You are then prompted to create a password, and then login. Now you are the proud new owner of a domain and hosting! ?
Step 3: Install WordPress at Bluehost
Now you need to install WordPress at Bluehost. This only takes a few minutes. As a reminder: Bluehost is the place you store your website files; WordPress is free software that you use to build the website.
When you login to Bluehost for the first time, you see the following screen:

a) Enter the website name and tagline. These words appear at the top of your website and are usually similar (or identical) to your domain name. The tagline is a short statement (like a slogan) that sums up the website. You can easily edit and change these later, so just choose anything for now and then click 'Continue.'

b) Select the appropriate options on this screen (it doesn't really matter what you choose) and click 'Continue to Theme Selection.'

c) Choose a WordPress theme. By default, WordPress comes with a theme pre-installed. Here you are just selecting the one you wish to begin with (you can easily change themes later, so don't worry about making the 'perfect' choice). There are many more WordPress themes than are shown here, and I run through how to change and customize a WordPress theme below, so it doesn't really matter which theme you select here!

d) On the next screen, there are two important links (top right corner). The first, 'View My Site,' is a link to your brand new website! You can see that you now have your very own WordPress website, live on the internet. Of course, at this point, it appears very bland and empty, because you haven't customized it or added any content.
The other link, 'WordPress,' is to the WordPress admin panel (you should 'bookmark' this, as it is common for people to forget how to find this again) – also known as your WordPress dashboard. This is where you edit your WordPress site and add content to it.
Now you are ready for the fun to begin!
Step 4: Build your artist website!
At this point, many people wish to leap in and begin playing around with WordPress. This is an excellent idea and a wonderful way to learn. However, for those who would like more detailed guidance, key pointers regarding the best way to begin building your artist website are detailed below:
Change the appearance of your artist website by adding and customizing a theme
- In the WordPress dashboard, go 'Appearance' > 'Themes'.
- Click 'Add New'. This takes you to the WordPress theme directory – thousands of free themes, approved for use with WordPress (be very careful sourcing WordPress themes elsewhere).
- Search through the themes. It is easy to get overwhelmed and spend forever doing this. You can switch themes at any time, so don't worry too much about finding a perfect theme right away. Aim for a simple theme to start with.
- When you find a theme you like, click 'Install' and then 'Activate'.
- Once activated, click the customize button (The customize button can be accessed in three places: under the theme when you first install it, as described above; in the dashboard menu, under 'Appearance'; and in the top black bar, when viewing your website). Each WordPress theme has different customization options available – some are very flexible; others are simple.
- Once you have made some changes, click save, then visit and refresh your website. You will see it now looks totally different!
- Tips and advice specific to customizing the appearance of an artist website will be added in separate tutorial coming soon.
Add a page to your website (i.e. an 'About Me' page)
- In the WordPress dashboard, go 'Pages' and then 'Add New.'
- Add a title – let's call this 'About Me' or something similar.
- Type in the central box to add content to the page. For now, just add some sample content (a short blurb about the website, yourself, or your artwork), so you get an idea of how WordPress works. Don't worry about making this perfect – you can easily edit this later. To add headings and subheadings, click the '+' symbol top left, and choose 'heading,' selecting H1, H2, H3, H4 or H5, depending on the size of the heading required. You can also add bullet points
 , quotes
  , or link to other websites, using the link symbol
 .
. - To add an image, click the '+' symbol top left, and scroll down to select 'image' or 'gallery' (under the media section). You can then upload an image from your computer.
- When your page is done, click publish.
- Click the View Page link, and you can see you now have a new page, live on your website.
Add a 'post' to your website
Posts are very similar to pages (they look the same). However, there are two main differences:
- Posts can be categorized. For example, if you create an artist website, you might have a collection of posts about paintings; another collection about drawings and so on. You can then link to each category on your menu, so that clicking this takes you to all of the artwork in this category (menus are explained in more detail covered below).
- Posts appear in lists. For example, by default, your latest posts appear in a list on your home page.
Posts are useful for most content on your website, as they allow you to easily organize content. Pages, on the other hand, cannot be categorized and do not appear in lists. Pages are best for standalone content, such as an About page, or a Contact page. Don't worry too much if this all sounds confusing; it will become clearer as you use WordPress.
For now, practice creating a new post as follows:
- Firstly, go 'Posts' > 'All Posts' (in the WordPress dashboard).
- By default, WordPress comes with a sample post already created. Click 'Trash' to delete the sample post. You need to move your mouse near the title for the delete option to appear.
- Now, to create a new post, click 'Add New.'
- Add a title and some sample content to this post. As before, add an image if desired, and click insert into post.
- Select a category for the post (right of the screen, partway down). Click 'Add New Category.' Create a name for the category. I have used 'Paintings' as an example. Parent Categories are useful if you wish to have categories that are sub-categories of others. For example, you might have a main category of 'Paintings,' and then sub-categories called 'Acrylic Paintings,' 'Oil Paintings,' and so on. Then click 'Add New Category' (the lower button). Categories make it possible for you to group and organize content, helping your visitors to navigate around your artist website and find related material.
- The tag function (optional) allows you to add keywords, kind of like a hashtag on Instagram or Facebook.
- Set a featured image (recommended) from the bottom right corner of the screen. The featured image usually displays as a large image at the top of the post or as a thumbnail image when shown in a list.
- When you're done, click 'publish.'
- Click 'View post' to see the new blog post post, with the featured image at the top of the screen.
- Finally, if you visit the homepage, you can see that the new post now appears there.
Add a menu to your artist website
Menus allow people to navigate from one page to another on your website. Let's begin by creating a menu at the top of the page.
- Go 'Appearance' > 'Menus' (in the WordPress dashboard).
- Click 'Create Menu.'
- Add items to the menu. Tick items on the left and click the 'Add to Menu' button. For example, you can add pages, posts, and categories that you have created.
- Reorder the menu items as appropriate. I have indented the 'Seascape Paintings' post under the 'Paintings' Category. This means it will appear as a drop-down item on the menu, under Paintings.
- Rename the menu items as appropriate. Clicking on the menu item allows you to rename it to a shorter, abbreviated title.
- Select the display location. Some themes allow you to display the menu in more than one place (for example, in the footer or sidebar). Select 'Top Primary Menu.'
- Click 'Save Menu.' If you visit and refresh your website, you will see you now have a menu across the top of the screen.
Add plugins to your artist website
Plugins are like 'apps' for phones: they add extra functionality to your website. There are more than 50,000 free plugins available, which add contact forms, social media buttons, buy now buttons, and so on. The more plugins you add, the more complicated your website becomes, making it slower to run. I recommend having no more than 20 plugins per site.
- Go 'Plugins' > 'Installed Plugins' (in the WordPress dashboard).
- Delete the existing plugins (these are installed by default).
- Click 'Add New.' This takes you to the free WordPress plugin directory.
- Note the plugin rating. Before installing a plugin, you should check its rating. A good plugin is usually installed many times, is recently updated, and is compatible with the current version of WordPress.
- When you find a plugin you like, click 'Install Now' and then 'Activate.'
- You are then taken back to your list of installed plugins. Underneath the name of the plugin you have installed it says 'Settings.' Clicking this allows you to edit the settings of that plugin.
Add or remove sidebar 'widgets.'
A widget is a small item that appears in the sidebar or footer of your WordPress website. Everything that is currently in the sidebar of your website is a widget.
- Go 'Appearance' > 'Widgets' (in the WordPress dashboard). On the left-hand side of the screen is a list of all the widgets that are available. On the right-hand side of the screen is are the areas where widgets can be placed.
- By default, the sidebar comes with several widgets placed in it: a search box, a list of recent posts, and so on. Delete any widgets that you don't want to appear. To delete them, drag any widgets out of the sidebar area. Alternatively, click the down arrow beside them (as shown above) and click 'delete.'
Final words
For those who would like more assistance, I am in the process of creating additional in-depth tutorials to guide people through the process of building an artist-specific WordPress website, as well as how to measure and grow traffic to your website, with artists and creative entrepreneurs in mind.
If you have found setting up WordPress confusing, please don't fret! As with anything new, it takes time to become familiar with where the shortcuts and buttons are in the WordPress dashboard. The key is to get started: WordPress is learned fastest by using it. And once WordPress becomes second nature to you, the rewards are enormous! Right now I make my living running websites (and am taking a break from teaching), which is particularly awesome in this current climate!
If there is anything in this video that you need help with, please don't hesitate to send me an email. I update this tutorial regularly, and feedback is highly valuable and appreciated.
Thank you! Get started, and visit Bluehost to begin!

Amiria has been an Art & Design teacher and a Curriculum Co-ordinator for seven years, responsible for the course design and assessment of student work in two high-achieving Auckland schools. She has a Bachelor of Architectural Studies, Bachelor of Architecture (First Class Honours) and a Graduate Diploma of Teaching. Amiria is a CIE Accredited Art & Design Coursework Assessor.
How To Have Your Own Blog Website
Source: https://www.studentartguide.com/articles/how-to-make-an-artist-website
Posted by: fabriziotwoured.blogspot.com
0 Response to "How To Have Your Own Blog Website"
Post a Comment